Connecting Your Game Systems
by Marriott_Guy |
Regardless if you have an old school 19" CRT or
a brand spanking new 3D HDTV, connecting your video game system can sometimes be a daunting task. The myriad of connection types, cords and
switches can be overwhelming, even to the most savvy of aficionados. This article will guide you through this process to produce the
best presentation (without modding) on your NTSC display device.
Consoles have utilized a wide assortment of AV (audio/video)
connections throughout the years. The challenge in connecting your video game system boils down to the following:
What are the console's connection options?
What type of inputs do I have on my television?
What other consoles (or other devices) do I need to have connected as well?
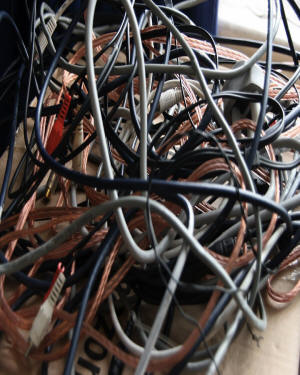
Answering these basic questions is paramount for getting your 'game on' and avoiding the entanglement pictured to the right.
Clean, simple and easy to follow diagrams accompany each solution along with our recommendation for achieving the best audio/visual output without spending a ton of coin.
These include
connecting basic TV service and multiple systems, along with various video converters to further assist you.
Some consoles support multiple connections, whether it be natively (out of the box) or with an optional video cable upgrade. These will be identified as such throughout the course of this
article. To ensure compatibility, we will only be listing first party upgrades.
Use the tabs to navigate
to the topic of your choice.
|
|
 RF Connection RF Connection |
What is a RF Connection?
RF, an acronym for Radio Frequency, was the first
connection method utilized by electronic devices. Early sets were designed to accept only over-the-air transmissions from the local
networks, using the antenna on your roof (or atop your TV) to acquire the analog signal. Early game systems had to simulate an actual
TV RF broadcast for your television to be able to interpret it (hence the channel 3/4 switch). This type of connection produced varying
levels of picture/audio clarity since it is quite prone to interference from a number of other devices.
Connecting your Game Console
There are many ways to connect consoles that utilize this technology. The following diagrams depict not only the history of original setup, but also the most common configurations for both
SDTVs as well as HDTVs. Click the pictures to enlarge.
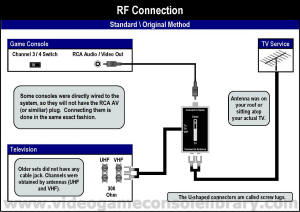 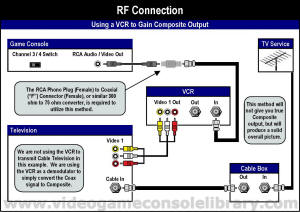
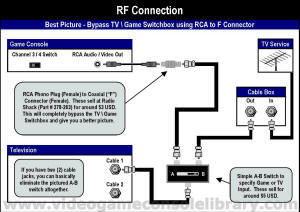 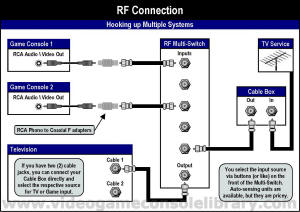
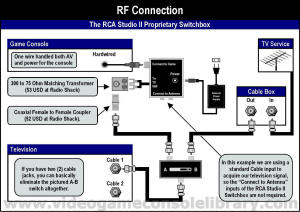 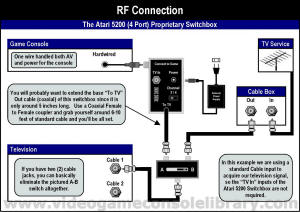
We recommend bypassing the TV\Game Switchbox method
to achieve the best picture/audio clarity. Early systems look best on SDTVs (standard definition television) while games will appear
extremely blocky on most HDTVs (high definition television).
Connecting a Japanese System via RF
Older RF systems from Japan, like the original Nintendo Famicom, work the same way as those in North America, with a caveat - those consoles utilize a Channel 1/2 switch, which are transmitted
on a non-compatible frequency with NTSC-U televisions. There are a couple of ways of getting your Japanese RF system to work, but bypassing
the TV\Game Switchbox as described above is the way to go in the long run. Using the RCA Phono to Coaxial F connector will provide you
with a basic cable output, which then you can route to your television using whatever method you like. This is where is gets a little
tricky - what channel to select.
The frequency that Japanese systems transmitted
its RF signal is sent at 91.25 and 97.25 MHz, respectively Channel 1 and Channel 2 in Japan. The problem is that neither of these frequencies
have a direct match with any standard North American station(s) - these fall in between 'conventional' channels. The closest channels
on your NTSC-U set, frequency wise, are 95 and 96. Your television must be able to tune to one of these respective channels. Some
televisions can perform per-MHz tuning when receiving a signal that is not identical to the channel. This feature is a great addition
and will provide you with the best picture (in lieu of having a Japanese television). Do NOT randomly swap out power supplies from these
systems and their North American counterparts (where applicable, like the Famicom and the NES) - you may fry your system.
|
|
 Composite Connection Composite Connection |
What is a Composite Connection?
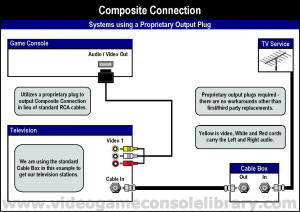
A Composite connection delivers an analog signal to your television.
This connection consists of three cables - a dedicated video cable (Yellow) and Left\Right audio cables (White\Red). Unlike RF Connections,
Composite separates the video stream from the audio. This produces a significant increase in picture clarity.
Connecting your Game Console
There were a few systems that offered a Composite connection
using standard RCA cables. We love these since it is a breeze (and cheap) to replace the AV cable if you misplace the original cords.
The majority though require a proprietary AV cord to connect your system. Manufacturers tend to prefer this method to create an additional
revenue stream when you have to replace your missing AV cable. The other reason for this practice is to allow official video 'upgrades'.
An enhanced Component Cable may be offered to produce heightened picture clarity compared to the standard.
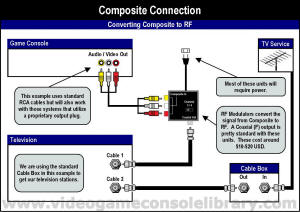
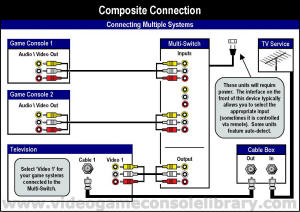
In the following diagrams, we included the method to convert
your Composite Connection to RF in the event that you have a television that does not support this (rare). Click the pictures to enlarge.
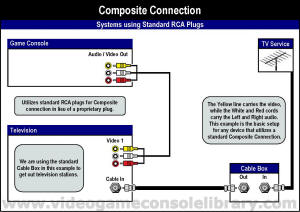 
Later systems utilized the lack of resolution in SDTVs to actually
soften/blur their images to produce a better picture. Playing these systems (notably the SNES) on HDTVs will greatly amplify the imperfections
that were meant to originally enhance the picture. Another thing to consider is that certain HDTVs can exhibit a brief lag time - this
is due to upscaling the image to the resolution of your set. Some HDTVs come with a 'Game Mode' to basically turn off this feature,
thus producing zero lag time. With all of that being said, using a SDTV is preferred since these systems were designed for the 'small
screen'. |
|
 S-Video
Connection S-Video
Connection |
What is a S-Video Connection?
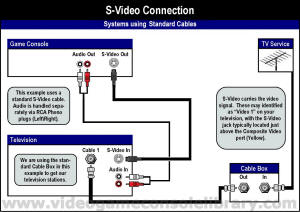
S-Video improves upon Composite by separating the color information
(Chrominance) from the brightness (luminance). This delivers greater color accuracy and sharper picture detail than delivers a standard
Composite connection. Audio is once again transmitted separately through standard RCA Phono plugs.
Connecting your Game Console
There were a few systems that offered S-Video output.
Many times these systems were also equipped with Composite output since S-Video was not universally embraced as a standard by television manufacturers.
We have provided various ways to convert the S-Video native signal, but please be aware that some signal loss may occur. Also, converting
to Component video will not upgrade the initial S-Video input feed.
 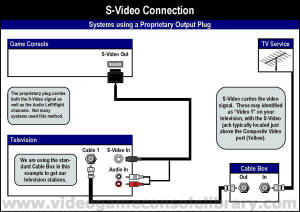
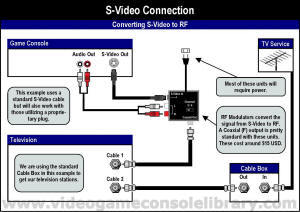 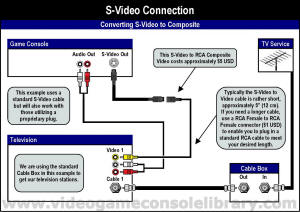
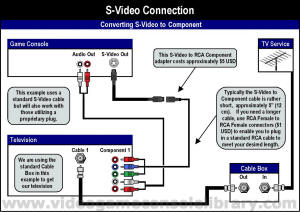 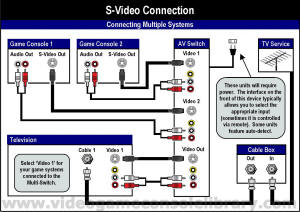
Though the picture quality is greater than Composite, these
systems are better experienced on SDTVs for the same reasons mentioned above. Playing the classic systems in their big screen glory
is not bad at all - your eyes quickly adjust to the initial jagged edges. Overall, selecting the display device is purely driven by
user preference.
|
|
 VGA Connection
 |
What is a VGA Connection?
VGA is an acronym for Video Graphics Array. This connection
transmits an analog video signal - the audio feed is handled separately (typically through standard RCA Phono cables). What makes a
VGA Connection desirable is the high resolution output. This is mostly utilized when connecting a game console to a PC monitor (or other
HD display device).
One of the drawbacks to VGA is that the signal may deteriorate
when sending high resolution data over 20-30 feet. To ensure a clear picture at greater distances, there is a VGA CAT5E Extender (these
are pricey - $100 USD) or you can convert the signal to DVI. DVI handles both analog and digital data streams, but you must ensure that
your device allows for DVI-A Mode (analog). Since VGA is an analog signal, this will not convert to the digital only format of HDMI.
Connecting your Game Console
These systems utilize two screws to connect to the respective
display device. VGA cables are never included with any of the systems, so you will have to purchase one separately. The system
list above only lists officially supported cables (if not included as a standard output). There are many third party cables that allow
many other systems to connect in this manner, but the results are varied.
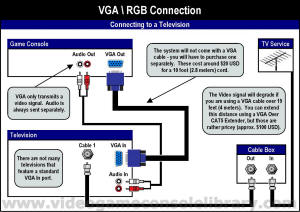 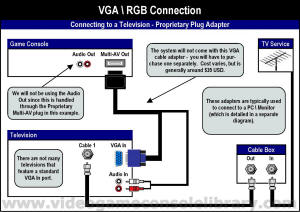
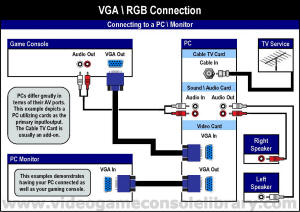 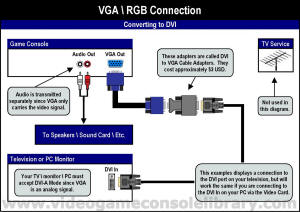
Please note that PC ports come in all sorts of configurations
- we just gave one example above to get you started. If you are going to connect a system in this manner, definitely use a HD monitor
for the best results.
|
|
 Component Connection
 |
What is a Component Connection?
With a Component connection, the video signal is further separated
into three channels - Luminance (brightness/white levels) and two Chrominance (color) feeds. This in turn produces a much sharper image
with increased color clarity and resolution. This connection is capable of carrying full HD (high definition) signals. Audio is
once again transmitted separately through standard RCA Phono plugs.
Connecting your Game Console
These systems are a snap to connect to your HDTV, a little
more involved (and pricey) to run through your SDTV if you don't have Component jacks. You can convert the Component signal to RF, but
cost wise it just doesn't make sense (dedicated RF Modulators are big money). Likewise, up-converting Component to HDMI is possible
but not realistic for most gamers. You would need an ultra expensive active converter circuit to get the job done ($300-$1000 USD).
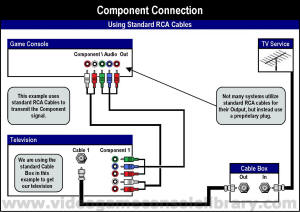 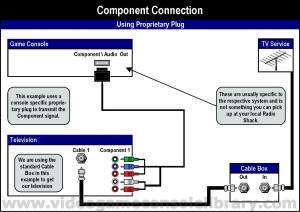
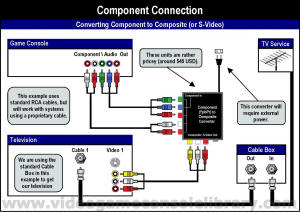 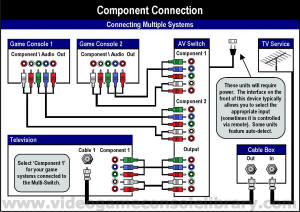
To truly experience these systems, definitely play them in
all of their big screen glory!! Even games that were not specifically designed for HDTVs will appear significantly better than on their
SDTV counterparts.
|
|
 HDMI Connection
 |
What is a HDMI Connection?
HDMI (high definition multimedia interface) is the industry
standard for delivering digital audio and video signals. HDMI is capable of carrying high definition, standard or enhanced video content
and supports eight (8) channel digital audio. HDMI is backwards compatible with DVI (digital video interface), another digital interface
found on some HDTVs and many home computers. The main difference between the two is that HDMI was designed to carry both video and audio
content, while DVI typically just delivers the video signal. HDMI also provides digital copy protection, termed HDCP (high-bandwidth
digital copy protection).
Connecting your Game Console
Game systems that employ HDMI deliver extraordinary audio and
video content to your HDTV. Since HDMI is designed to carry both the the digital audio and video signals, only one cable is required to connect
the device to your television. You can convert the digital HDMI signal to either Component or Composite, but this is extremely expensive
to accomplish (digital vs. analog). We have included examples of converting an HDMI signal to DVI and VGA, popular digital interfaces
for PC monitors and laptops (also included on some televisions).
Another aspect that is typically included on these systems
is a S/PDIF port. This allows you to send digital audio as a separate signal to your home theatre system. In most of these systems,
you have to identify via the console's set-up menu the audio source (either HDMI or S/PDIF). The cable that provides this optical connection
is called a TOSLINK.
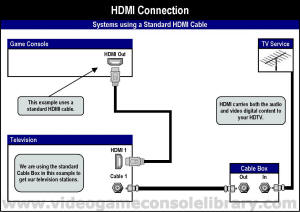 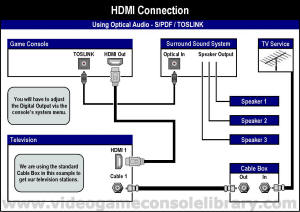
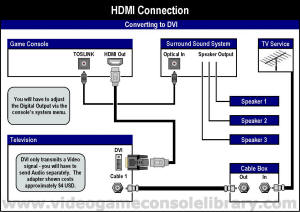 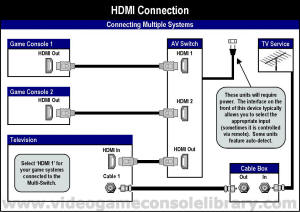
HDMI switches can be rather expensive - expect to spend approximately
$80 USD or more for the unit. Also ensure that your switch is HDCP compliant. There are 1st party converters that will convert
your signal to VGA (for use with monitors). These converters also separate your audio signal into standard RCA jacks, which is helpful
if your Surround Sound system or PC does not have an Optical In port.
|
|
|


 2010s - NOTES


 VGA Connection


 Component Connection


 DISCUSS